Eine steampunkige Umstzung von Andreas N. (Genehmigung zur Veröffentlichung der Bilder liegt vor). Dazu muss man sicherlich nicht viel schreiben. Toll gemacht – anschauen! Danke an Andreas für die Inspiration.
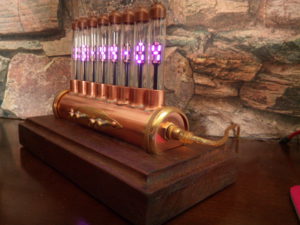
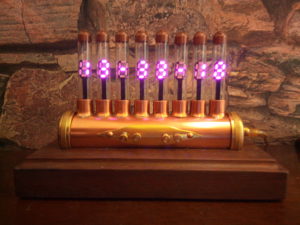
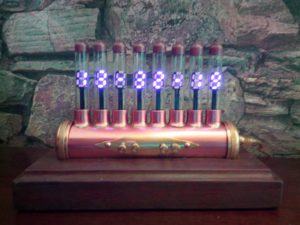
Eine steampunkige Umstzung von Andreas N. (Genehmigung zur Veröffentlichung der Bilder liegt vor). Dazu muss man sicherlich nicht viel schreiben. Toll gemacht – anschauen! Danke an Andreas für die Inspiration.
Nach langer Entwicklungszeit ist unser LED-PLAYER-L einsatzbereit. Mit 4096 ansteuerbaren Digi-Dots, Neo-Pixel oder ganz profan WS2811/12 nebst kompatiblen, ein Highlight bei den LED-Controllern. Das Gerät hat ein serienmäßiges OLED-Display, Menüsteuerung onboard mit vier Tasten. Kann sowohl via PC als auch über eine Config-Datei oder über die Menüsteuerung bedient werden. Die Ansteuerung erfolgt klassisch über USB. Im stand-allone Betrieb über SD-Card oder USB-Stick. Auch Serie ist erstmals ein Acryl-Housing was eine hohe Wertanmutung bietet und natürlich eine gewisse Schutzfunktion. Mit dem Player-L sind schon recht große, ambitionierte Projekte möglich. Messeauftritte, Werbebotschaften sowie künstlerische Medien und Installationen. Natürlich arbeiten wir am Player-XL, doch bis dahin ist der Player-L in gewisser Weise state of the art…
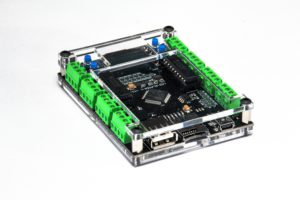
Auf dem Bild deutlich sichtbar die zwei DIL-Treiber für die Ausgangsports. Grund für diese Auswahl ist die jahrelange Erfahrung mit dem Player-M. So kann es im rauhen Alltagsbetrieb, bei der Messeinstallation oder anderen Umgebungen durchaus mal passieren, dass die eine oder andere Masseverbindung nicht exakt sitzt, immer eine Möglichkeit den Ausgangstreiber schnell und geräuschlos zu „killen“. Wenn es dann doch einmal passiert sind die „zerschossenen“ Leitungstreiber schnell und billig ersetzt. Das spart Geld, Frust und Nerven. Natürlich ist es besser, wenn man nichts wechseln muss, aber wir wissen alle, der Mensch macht Fehler und die Elektronik ist nicht immer gewillt, diese auch zu verzeihen.
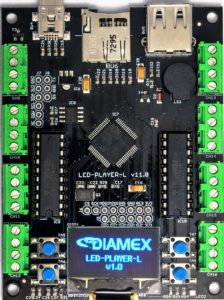
Äußerst attraktiv ist der Preis des LED-PLAYER-L ….. unter Hundert Euro.
Ein DIAMEX Produkt developed & made in Germany.
Vorläufiges Info – Blatt: LED-Player-L_Info
Nun endlich ist sie da, die Schöne und die Glockenklare: LED-Nixie M mit vier Stellen. Viele Interessenten / Bewunderer unserer LED-Nixie haben sich eine ruhige Variante gewünscht – möglichst keine nervöse Sekundenanzeige, klassisch und gediegen, eben.
Vier Stellen reichen vollkommen, das war die Botschaft. Wir haben hingehört und nun ist sie fertig. LED-Nixie 4 Stellen gibt es als Kit, komplett lötfrei. Alle Komponenten sind getestet. Der Aufbau ist auch für den interessierten Laien kein Problem und wird letztendlich ein wunderschönes Exemplar an Uhr auf den (Schreib-)Tisch stellen.
Besonderheit ist die Soundausgabe, die glockenklar daherkommt. Mittels LED-BASIC können diese Features angepasst werden. Natürlich gibts von uns eine komplette Software fertig aufgespielt, die sofort einsatzfähig ist.
Sicher ein Hingucker par exellence – schauen Sie sich einfach mal das Aufbauvideo an:
Hallo Leute,
in Kürze ist unsere neueste LED-NIXIE Kreation erhältlich, das dauert nur noch wenige Tage. LED-NIXIE-M 4 Digits. Viele User haben sich eine kleinere Version gewünscht. Die 6-stellige „M“ ist schon recht groß und ausladend. Für viele Nutzer sind die Sekundenanzeigen ein wenig unruhig. Wir dachten uns, dass wir es dann mal ganz anders machen, Soundmodul und Sync-Anschluss, sowie eine Temperaturmessung on board. Eine komplett lötfreie Version sollte es dann auch schon sein. Wie gewohnt in Basic programmierbar, aber neue Features wie wahlfreie Soundfiles um so eine Zeitansage oder eine glockenklare MP3-Files wiederzugeben. Das Kit wird mit allen Materialen kommen, auch die Elektronik komplett lötfrei. Ein eingebauter D-Verstärker liefert einen beeindruckenden Sound. Die exakte Zeit ist dann sicher auch eine Sache, die bisher hinter dem Design zurückgeblieben ist. Die modernen Cortex-Controller, die wir in den LED-NIXIES einsetzen, sind nicht unbedingt die Super-RTCs, sind also temperaturabhängig und unterliegen auch exemplarischen Streuungen – leider. Man kann zwar im Basic trimmen, allerdings hat das alles seine Grenzen.
Daher gibt es nun Sync-Module, die diesen Nachteil elminieren. DCF77, GPS-Sync und WLAN-Sync sind ab sofort erhältlich. In Kürze gibt es noch die Ultra-RTC, basierend auf einem hochgenauen RTC-Chip. DerAnschluss an die neue LED-NIXIE-M 4 Digits ist kinderleicht via 3,5er Klinkenstecker-Audiokabel. Auch ist der Anschluss des DCF77 an die Cronios-Controller möglich, wenn auch nur mit etwas Lötarbeit (drei Lötstellen). In der LED-Basic Doku ist das beschrieben.
Hallo.
Ich habe mir vergangene Woche den DCF77-Empfänger für meine LEDnixi-Uhr bestellt.
Leider klappt die Zeitsynchronisierung nicht und die Uhr geht innerhalb von drei Tagen vier Minuten vor.
Aktuell ist die Programmversion LED-Nixi-Doug-John-Vanessa.2.02.bas auf der Uhr, die LED im Empfänger blinkt im Sekundentakt, aber es erfolgt keine Synchonisation.
Zum Einspielen des Programms gabe ich die aktuellste Version von LED-Basic verwendet.
Neben dem Empfänger steh eine andere Funkuhr die ihr Signal problemlos empfängt und die sich auch Synchronisiert.
Woran kann es liegen, dass es nicht klappt?
Kann man über die Terminal-Funktion von LED-Basic feststellen, ob und wann ein Zeittelegramm empfangen wurde?
Vielen Dank!
Die Synchronisation ist vom Basic völlig unabhängig. Es ist eine Vitalfunktion, wie die Ausgabe der LEDs. Insofern kann man egal, welche Programmvariante eingespielt wird, immer synchronisieren.
Wir müssen den Fehler also woanders suchen. Ich persönlich checke alle DCF77 Empfänger auf exakte Arbeitsweise. Es wird also weder an der Uhr noch am Empfänger liegen.
Allerdings gebe ich zu, dass mitunter die Empfangssituation schwierig sein kann. Leider ist das DCF77 Signal außerordentlich empfindlich auf die PWM Signale der LEDs, die in der LED-Nixie verbaut sind.
Daher auch die drei Meter Klinkenkabel. Ich persönlich habe die Erfahrung gemacht, dass wenn man etwas Höhe geben kann, die Synchronisiereung deutlich besser funktioniert. Das Signal muss zwingend mindestens zwei Minuten exakt empfangen werden, damit eine Synchronistation erfolgen kann, erst dann stellt sich die Uhr ein. D.h. nach max. 3 Minuten sauberen Empfangs sollte die Uhr auch laufen.
Ich denke es ist die Wahl des Standortes, möglichst weit weg von der Position der Nixie, möglicht hoch der Empfänger angebracht. Indikator ist ein ruhiges und regelmäßiges Blinken. Ist unruhiges und unregelmäßiges Flackern zu sehen, dann kann man das Signal gleich vergessen.
Auch sollte man die Kalibrierungsfunktion der Uhr nutzen, um schon möglichst „von Hause aus“ eine gute Stabilität zu erreichen, vier Minuten sind sicher nicht optimal – das liegt an der Cortex eigenen RTC, die ist leider nicht hochpräzise, kann aber durchaus getrimmt werden. Abweichungen von wenigen Sekunden sind durchaus erreichbar. Die Temperaturabhängigkeit ist bei derartigen Mikrocontrollern leider nicht zu vermeiden.
Es kann sich also die Kombination aus beiden Maßnahmen helfen, CALIB-Funktion des Basic, um eine möglichst gute Trimmung zu erreichen und die Suche nach einem alternativen Standort für den DCF Empfänger.
Viel Erfolg
Grüße Folker
Dear reader,
thanks for being so patient. We try to answer the questions that reached us via e-mail or the social media in the following FAQ. We are sorry that translating them takes some time, especially at the beginning when you have to handle an increase in demand, many questions, and a different language simultaneously. We hope that the questions you asked are answered to your satisfaction.
When you read the FAQ make sure you don’t miss out on how the clock can be customized. There are several different options available.
We will expand this FAQ as more questions come up and as soon as there is more information on planned products or expansions.
We plan to make more information on our products available in English. We start off with the documents on how to program the LED-Nixie clock – that information is also applicable to the other LED Basic products. We will put a link to the file in here as soon as we finish the translation.
We picked Basic because it is a programming language that is easy to learn. This way, you need to invest less time until you get the first results if you decide to go for working with the code.
The clock is based on a project in 2015 that started out with only one module:
https://www.thingiverse.com/thing:880429
Later in the process we put six modules together to create a clock. We have spent a lot of thought on how to program the controller. The clock has a Cortex M0 controller by STM (STM32F072) with RTC. We employed Basic and modified it especially for PWM LEDs (neopixel). It controls all of the functions except for the autonomous functions in the BIOS like multiplexing, RTC, DCF77, and Basic. Learning how to use this modified version of Basic is easy.
On our website there are additional LED Basic controllers available. You can change them easily, even if the clock is already sitting on your shelf. These give you even more options to modify the clock.
For example, there is the M4 controller:
https://www.led-genial.de/Basic-All-In-One-max-1024-LEDs-viele-Funktionen
The code is open source so you have access to it. You need the Windows software (see download below) that comes with the clock to change the code.
The software download provides you with a document that contains more information on the code and the hardware of the device. We are currently translating this document. People who have experience with using code should be able to work with the code and diagrams provided even though there is no translation available yet.
You can have a look at the document by downloading the software (pdf is included) or by checking out the pdf document that is available on the same site. They are identical.
Download “Basic-Editor” (freeware, open source, Windows, English is included):
https://www.led-genial.de/LED-Basic-Downloads
The animations are customizable. They can be added or deleted from the code. If you like an animation that was provided with the clock you can have a look at the code and copy it. Then you can change it as you like – new colors, a different speed, apply it to different digits… You can also pick different colors for each digit or all digits.
This way, the animation involving the way the clock jumps from 9 to 0 can be changed or turned off. The clock comes with several files that already include other “themes” without this particular animation.
Please read the section “Customizing the LED-Nixie Clock” to find out how exactly you can change the settings of the clock.
We are working on a file that will make the clock display the MMDDYY date format. To apply it to the clock you need the Windows software that comes with the clock (see download link below).
Please read the section “Customizing the LED-Nixie Clock” to find out how exactly you can change the settings of the clock.
Download “Basic-Editor” (freeware, open source, Windows, English is included):
https://www.led-genial.de/LED-Basic-Downloads
We are currently working on a file which will enable the LED-Nixie clock to display the time in the 12 hour system. The Windows software that is provided along with the clock (see download link below) allows you to apply the file to the clock.
Please read the section “Customizing the LED-Nixie Clock” to find out how exactly you can change the settings of the clock.
Download “Basic-Editor” (freeware, open source, Windows, English is included):
https://www.led-genial.de/LED-Basic-Downloads
With this Windows software you can upload files to your LED product and give it a new look.
You can also use it to work with the LED Basic programming language and thus create new animations. Once you save them as a file you can share that file with others. Users who do not know how to handle code can then upload the file to their LED products.
Download “Basic-Editor” (freeware, open source, Windows, English is included):
https://www.led-genial.de/LED-Basic-Downloads
The clock comes with German standard settings. And as soon as you assemble it the clock starts playing animations. Nevertheless, it is very easy to customize it even if you don’t know how to handle code. The effects that the clock plays when you unwrap it are merely an example. It demonstrates as many features of the clock as possible, hence the many and vivid changes. There are several other settings you can choose from.
All you need to do is this:
On our website there is software called “Basic-Editor”. Download it to your computer by selecting the last version number on top of the page (the section is called “LED-Basic Paket”). English is included and can be selected in the program.
In this editor you find files that contain different settings for the clock. You connect the clock to your computer via USB and then you can change its settings within a matter of seconds by picking one of these files.
Download Basic-Editor (freeware, open source, Windows, English is included):
https://www.led-genial.de/LED-Basic-Downloads
Sharing Animations or Settings:
There are files and therefore “themes” that come with the software but you can also get creative and share them. People who know how to handle code can create animations and change the settings of the clock. Then they simply save them as one of the Basic-Editor files and put the file online.
If you don’t know how to program, all you need to do is download that particular file, connect your clock to the computer and select the file in your Basic-Editor to apply it to the clock.
There is a project to manufacture a clock with the same style that only has four digits instead of six ones. We will add more information on this topic to this FAQ as soon as it is available.
Global shipping is available on EBay and on www.led-genial.de
The nuts are indeed a little tricky. Tightening them with your hands is sufficient. We don’t recommend using tools.
The first animations you see as soon as you have assembled the clock are an example. They are so colorful and vivid because that example is supposed to show you what the clock can do. In the software there are more files you can apply to the clock to change its look.
Additionally, with these animations you can check immediately whether the clock was assembled correctly and whether all of its parts work properly.
Please read the section “Customizing the LED-Nixie Clock” to find out how exactly you can change the settings of the clock.
Customers reported problems assembling certain parts of the kit. Since these components are crucial to make the clock work properly we decided to assemble them for the customer.
In Europe you can use DCF77 with the current version of the clock.
We are currently working on a project creating a new controller that uses Wi-Fi or GPS for synchronization. You can change the controller of the clock. We will post more information on this topic as soon as it is available.
We will soon release a .sys file that will calibrate the oscillator of the clock and make the time displayed by the clock become very precise. The file will be accompanied by an article explaining how to do that.
Techmoan präsentiert in einem seiner Videos unsere LED-Nixie:
Die darauf folgende Resonanz war schon recht raumgreifend, um es einmal milde auszudrücken. 😀
Aber ok, Bestellflut hin und her, wir haben unsere Produktionskapazität geprüft und natürlich auch hochgefahren und produzieren nun mit Volldampf LED-Nixies für die Freunde dieses Anzeigekonzeptes. Ein paar Tage wirds dauern, aber jeder Besteller bekommt noch im Mai seine LED-Nixie….
Amerikanische Interessenten wünschen sich eine 4-stellige Version, ohne die „nervöse“ Sekundenanzeige. Das ist gar kein Problem, da wenige Stunden vor der Veröffentlichung des Videos genau dieses LED-Nixie-Derivat beauftragt wurde. Zufall pur oder weise Voraussicht? Wird wohl Niemand je erfahren…
Dank der eingesetzten LED-BASIC-Software ist auch die Anbindung an das etwas andere Zeit- und Datumsformat kein Problem. AM / PM – Visualisierung müssen wir uns noch austüfteln, auch hier wird es durch die kinderleichte LED-BASIC Ausstattung keine größere Herausforderung geben.
Man braucht für LED-Nixie keine Library, keinen Sketch und keine weitere Hardware – geht alles mit dem eingebauten ARM-Cortex-Controller. Die Betriebssoftware ändert man mit dem freien LED-BASIC-Editor. So kann man auch die Beispieldateien ändern, anpassen, modifizieren oder auch sharen, also teilen. Mit selbsterstelltem Basic-Code kann man natürlich auch so verfahren.
So viele neue Programmiersprachen haben neue, moderne Features. Basic ist mitunter verpönt – möglicherweise das Flair einer Anfängersprache – aber weit gefehlt: Mit LED-Basic erstellt man in ganz kurzer Zeit tatsächlich eigene Kreationen, die für Verblüffung sorgen und das ganz ohne Studium oder tagelange Einarbeitung. Ein Nachmittg genügt und schon hat man beeindruckende Ergebnisse. Ausprobieren!
Insofern viel Erfolg und Spaß mit LED-Nixie – Besucht uns auf der Berliner Makerfaire:
FEZ-Berlin, Straße zum FEZ 2, 12459 Berlin, im oberen Foyer, Stand 74.
Wir freuen uns auf Euer Kommen.
Ab sofort kann der beliebte Editor „VS Code“ um die LED-Basic Unterstützung erweitert werden. Das Plugin kann direkt aus dem VS Marketplace installiert werden.
Features der aktuellen 1.0.1 Version:
– Code snippets: for/ford + TAB generiert einen for-next block
– Anzeige der API Signatur bei MouseOver
– Codevervollständigung
– Anzeige der Beschreibung der Funktionsparameter
– Sprünge zu den Labels über „Go to definition“
– Liste alle Referenzen auf ein Label über „Find all References“
– Live Code Analyse auf Fehler in der Syntax
– In der Statusbar kann das Board ausgewählt werden. Das hat Auswirkung auf die Code Validierung, um etwa Befehle zu entdecken, die nicht unterstützt werden
Aktuell muss der Code weiterhin unter Windows mit dem offiziellen Editor auf das Gerät hochgeladen werden. Für eine künftigen Version des Plugins ist auch der Upload direkt aus VS Code geplant.
Probleme und Vorschläge auf der github Seite der Extension melden.
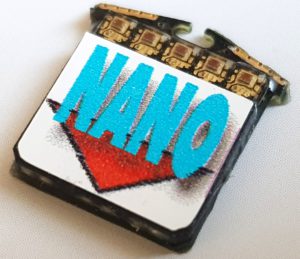
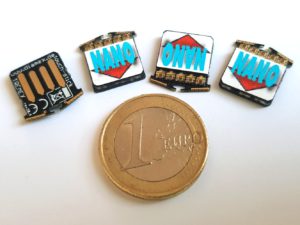
Crowdfoundig ist ja zur Zeit schwer angesagt. Auch TOMU , ein kleiner USB-Stick mit speziellen ARM-M0+ Controller von Silabs, wurde so finanziert. Wärend der geneigte Geldgeber dann mal bis Juni auf das Schnipselchen wartet, schlimmer noch, es ist bisher noch keine Software in Sicht, die auch für Nichtprogrammierer bedienbar ist, gibts ab sofort von DIAMEX bzw. LED-Genial einen LED-Basic basierenden Stick für den USB-Port. Der kann dann auch die fünf ultrahellen APA102, die auf dem Board integriert sind, aus dem Basic heraus ansteuern. Zwei Touches sind ebenfalls onboard, gleichfalls im LED-Basic individuell programmierbar. Eine kleine Lightshow ist kinderleicht und schnell erstellt und sieht dank der digitalen PWM-LEDs auch noch richtig klasse aus. Aufgrund des Verzichts auf einen speziellen Microcontroller, es ist ein STM32F042 im Einsatz, ist der Nano-Stick ein recht preiswerter Kamerad. Einzelstücke schon unter 15 Euro. LED-Basic erhält zudem noch ein spezielles Befehlsset, was die Kommunikation mit dem PC ermöglicht. Abfragen oder Parameterübergaben lassen sich so nutzen um verschiedenste Events auszuwerten und funktionell zu nutzen. Auch ist kein DIY notwendig, der Stick ist fix und fertig sofort einsatzbereit. Und ja, entwickelt und produziert in Berlin, also made in Germany.
Technische Daten:
Programmiersprache: LED-BASIC (Freeware)
STM32F042G6U6; 32 bit, 32KByte Flash, 6 KByte RAM, 48 MHz
5x APA102 PWM-Micro-LEDs
2x Touchpanel frontseitig
14×14 mm, 2 Gramm

Wir haben ein weiteren Power-Dot entwickelt, welcher mit einer 10W RGB-LED läuft. Betriebsspannung ist 12V und das Teil ist auch WS2811 kompatibel. Somit kann man die „dicken Dinger“ auch mit den Strips und Panels kombinieren. Eine ideale Spielwiese für unsere (Basic-)LED-Player. Die 10W Power Dots sind unglaublich hell – entsprechen etwa einem 120Watt Halogenstrahler, können zur Objekt- und Effektbeleuchtung eingesetzt werden. Wände anstrahlen, oder Hintergrundbeleuchtungen auf der Messe oder im Theater, mit diesen RGB-Flutern kein Problem mehr. Gefertigt auf modernen ALU-Platinen sind diese nur 48x48mm groß, benötigen zusätzlich einen (ALU-) Kühlkörper für die Power-LED.
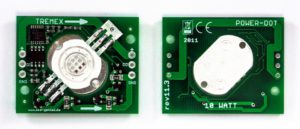
Produktionsbeginn ist Anfang 2. Quartal 2018
Weitere Leistungsstufen sind für 2018 geplant.